
How To Organize Your Pantry

Pantry Organization does not have to be intimidating. Organize your pantry in these easy steps!
Decide on Style
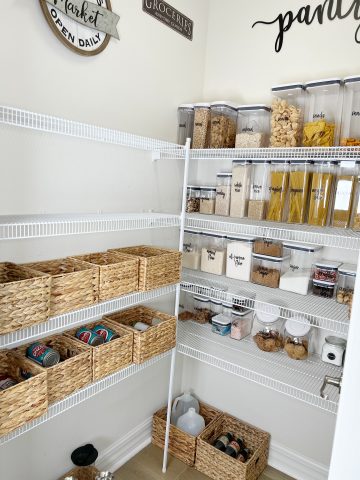
When you imagine the perfect pantry, what does it look like? Is it modern with sleek lines or farmhouse inspired with natural baskets? Is function or appearance more important? How much space do you have to work with? While space will not dictate style, it will certainly have an effect on the final result. When I imagined my perfect pantry, the only thing I knew for sure was I wanted to use baskets. I am also a fan of pantries that look retro – kind of like an old fashioned neighborhood market. So, I knew I wanted something along those lines.
Decide on Containers
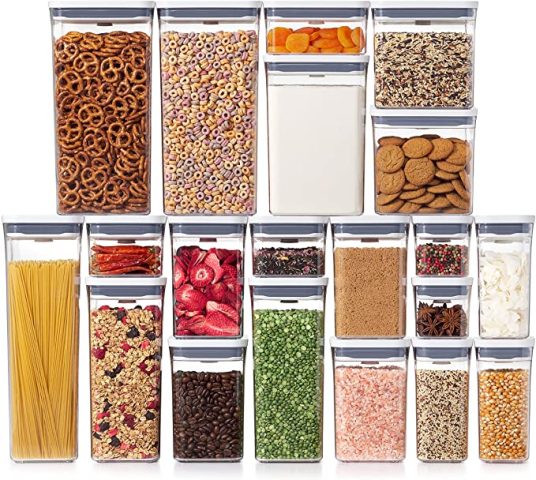
This step took the longest for me. I knew I wanted some clear pantry containers, but I was not sure of what brand to buy. I was initially attracted to the OXO brand but the price seemed a bit high. I spent a lot of time researching other brands of pantry containers on Amazon and reading reviews. I almost bought another brand, but ultimately decided the OXO brand was worth the extra investment. I absolutely love them. They open and close easily, provide an airtight seal, and, best of all, they stack on top of each other and beside each other with no wasted space. That was the ultimate selling point for me. I wanted to make best use of my pantry space and the OXO Pop Containers definitely allowed me to do so. I ordered a large set of 20 various sized containers (with lids), and a bulk set of 3 containers perfect for holding 5 pound bags of sugar or flour (they also come with scoops). It was a good start.
Deciding on baskets was a bit more difficult. I knew I did not want to look into my pantry and see a variety of colored cans. Visually, I wanted less clutter. If you are fine with visible cans, then you might not need many baskets. I was not, so that meant quite a few baskets.
The first baskets I tried were a set from Honey Can Do from Amazon. The baskets are really pretty and I like the way they fit neatly against each other on the shelves. The set comes with three sizes of baskets, so they are also quite versatile. They have built-in handles (as do all three baskets I tried). Personally, I didn’t want to see the handles, so I turned mine sideways on the shelf. Ultimately, I decided the large size basket was not large enough for my needs (large packages of bottled water, cases of soda, etc.), so I ordered a different basket set and used the Honey Can Do baskets in my closet.
The second basket set I tried is from the DII Store on Amazon. This set of 5 Water Hyacinth baskets worked great on a number of factors. They looked good, they fit nicely on the shelf (the bottom is slightly smaller than the top), they were affordable, and the set of 5 baskets includes one huge basket, two medium baskets, and two smaller baskets. The medium and small baskets worked great to hold cans and the big basket was plenty big enough to hold anything that I needed it to hold in my pantry. I definitely liked this set a lot and filled my pantry with them.
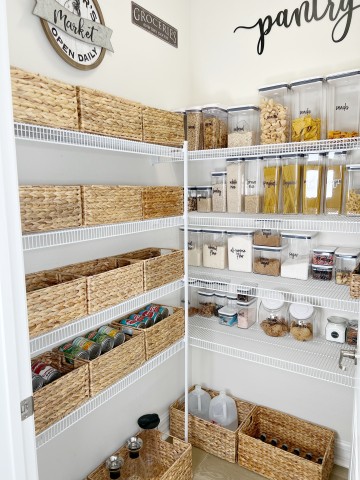
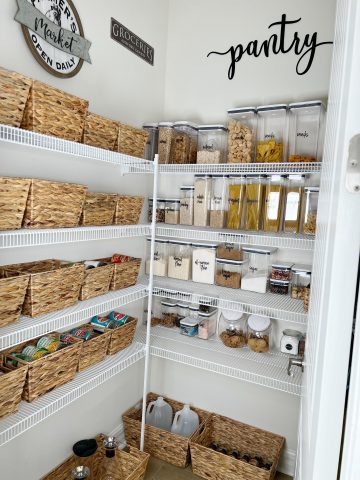
Unfortunately, there was another set of baskets that I liked even more. These were from The Container Store and they just happened to be the perfect size for my narrow shelves, both in length and width. I also loved the way they snugly fit into each other with no gaps, maximizing my storage space. Ultimately, they ended up being my favorite baskets, although also the most expensive choice. These baskets are available in a variety of sizes, so measure carefully before ordering. I ordered 12 of the small baskets and 4 of the large baskets.
Order and Install Additional Shelving if Necessary
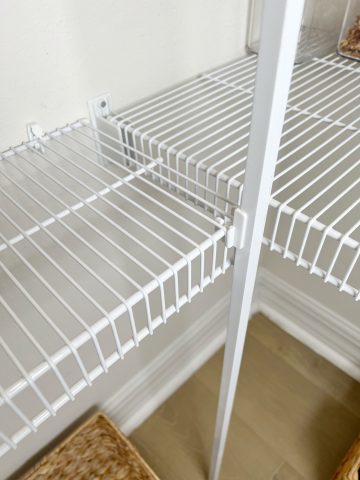
My pantry is not very large. It is basically a deep closet next to my kitchen. The builders installed one deep row of multiple shelves on the back wall. I knew I wanted to add more shelving and settled on some more narrow shelves that we installed on the remaining wall, resulting in a typical L shaped pantry.
Most pantries either have wood shelves or wire shelves. I prefer wood shelves but in the interest of saving money, I decided to match the shelves that were already installed by the builder and went with wire shelving. When adding wire shelving to a pantry, be sure to add the type that has narrow gaps between the wires, not the widely spaced shelving that is more suitable for closets.
Remove Everything From Your Pantry
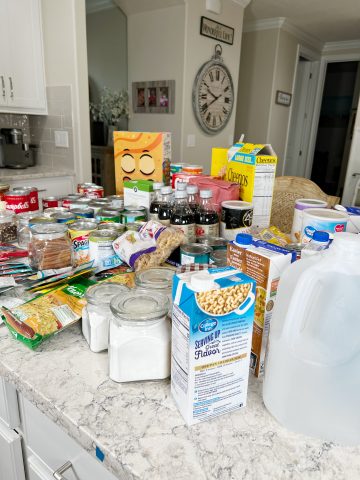
Even if you are not adding shelves, it is a good idea to remove everything from your pantry. It is easier to organize your pantry if you can actually see everything together. I placed all of my cans, boxes, and bags of food on my kitchen counter. This also made it easier to thoroughly clean my pantry before organizing it. While you have everything on your counter, check for expiration dates. I was surprised to find that I had five cans of vegetables that had expired.
Determine Needs
When everything is scattered across your counter (or on your dining table), it is easier to determine what type of storage you most need. Do you have lots of different types of pastas and need containers for those? Do you primarily store canned goods in your pantry? Do you like to “see” your canned goods? If so, you might be better served buying handy clear plastic or metal racks that display your canned goods. Do you have pets? If so, you will also need containers for their food. Do you bake a lot? Do you use different types of flour (almond, all purpose, whole wheat, etc.), and need individual containers for each? Do you store your spices in your pantry? If so, you will also need spice jars. I love this set. It comes in a variety of sizes and includes handy labels. Grab a pen and paper and jot down the type of containers you need as you assess your needs.
Order Items
I ordered most of my pantry storage items from Amazon. With quick and free delivery, Amazon is difficult to beat. In addition, they make it easy to do returns (usually free) if your items don’t work out. For my pantry, I first ordered 4 sets of the Honey Can Do baskets from Amazon, then 4 sets of the DII Store baskets from Amazon, and ultimately from The Container Store, 12 small baskets and 4 large baskets. I ended up keeping the Honey Can Do and DII Store baskets and using them for storage in different areas of my house. The Container Store baskets ended up being my favorite baskets for my pantry.
When I ordered the OXO Pop Containers, I knew I would need quite a few but started with the 20 piece set (10 containers with lids) and the 6 Piece Bulk Canister Set (3 canisters with scoops that hold 5 pound flour or sugar bags). Eventually, I added more OXO sets (see below), but these were a good starting point.
I also knew I wanted labels on my containers so I ordered this fabulous of pantry labels on Amazon from Talented Kitchen.
Order More Groceries
While you are checking for expiration dates (and possibly discarding items), you might as well order any missing items so you will have a fully stocked pantry. If you are going to organize your pantry, you might as well do it right! If you store spices in your pantry, now is a good time to replenish spices as well.
Fill Containers and Order More If Needed
Now the fun part! Wash and dry all of your containers in hot soapy water and and dry to prevent spotting. No, that’s not the fun part. Filling them is the fun part! There is just something so satisfying about tearing open those assorted bags and boxes and placing their contents into shiny new containers. And, then, even better, adding labels! I have to admit, I had so much fun doing this. When it comes to pantry organization, for me, this is the best part. My messy and chaotic pantry was disappearing with every filled container. Enjoy, my friend. Enjoy!
Tip – You can mark the back of your pantry containers so you have an idea of how much they hold. For example, I marked mine to show one pound of pasta. Marking it on the backside of the container ensures the mark will not be seen when on the pantry shelf. In hindsight, I advise placing a clear piece of tape on the back of the container and then writing with a permanent marker on the piece of tape instead of directly on the container as I did. That way you can just peel off the tape if you decide to use that container for something else.
Create a Visually Appealing Pantry
If such things are important to you, take some time arranging your filled containers on the pantry shelves until you are pleased with the result. Initially, I thought I would combine my OXO Pop containers and my baskets on the same shelves. After fussing with them for awhile, though, I realized my pantry looked better with the OXO containers on one side of the pantry and the baskets on the other. If you don’t care about how your pantry looks, and are just thinking about function, determine how to make best use of your pantry space and don’t worry about appearance. Do whatever works for you.
Move or Hide Extra Stuff if Possible
Chances are, if your pantry is anything like mine was, it is a bit of a catchall and you have extra items in there. If possible, move that extra stuff to a kitchen cabinet or storage closet so your pantry remains focused on food storage (and looks better!). In my case, I had a large food dehydrator and a KitchenAid Mixer that I moved to a closet. While this step isn’t necessary, it definitely helps you to create a more attractive pantry.
Add Pantry Decor
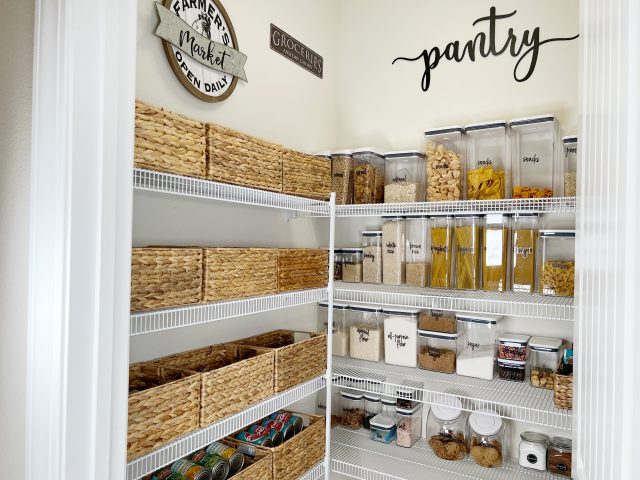
This step is optional, but how can you resist adding some cute pantry decor after you have just created the perfect pantry? I added three metal signs in my pantry. Two of them provide that retro feel that I wanted to include in my pantry. All are linked below!
I hope I have inspired and helped you with these simple steps on how to organize your pantry. If you organize your pantry, let me know how it went in the comments. I would also love to hear from you in the comments if you have any great pantry organization tips! Thanks for stopping by!
YOU MIGHT ALSO BE INTERESTED IN…
I did an Amazon Live on Pantry Organization. You can still watch it and shop from the carousel here
I also did a You Tube video on Pantry Organization. You can watch it and shop all items here
SHOP ALL ITEMS HERE…
OXO 20 Piece Containers with Lids
OXO 10 Piece Containers with Lids
OXO 6 Piece Bulk Set for Sugar or Flour (3 containers)
OXO 12 Piece Bulk Set for Sugar or Flour (6 containers)
Talented Kitchen Pantry Labels
OXO Good Grips Cookie Jar (two sizes)
OXO Pop Container Pasta/Spaghetti/Lasagna Container
OXO Set of four 6 Quart Pop Containers
OXO Set of 4 Slim Pop Container
OXO Set of 3 Cereal Containers
Storage Works set of 2 Three Compartment Baskets (great for seasoning packets)
Storage Works set of 2 Open Ended Baskets (great for coffee pods)
My Metal Pantry Sign, Black Script
